Photography Guide · Tips, Settings & Shots
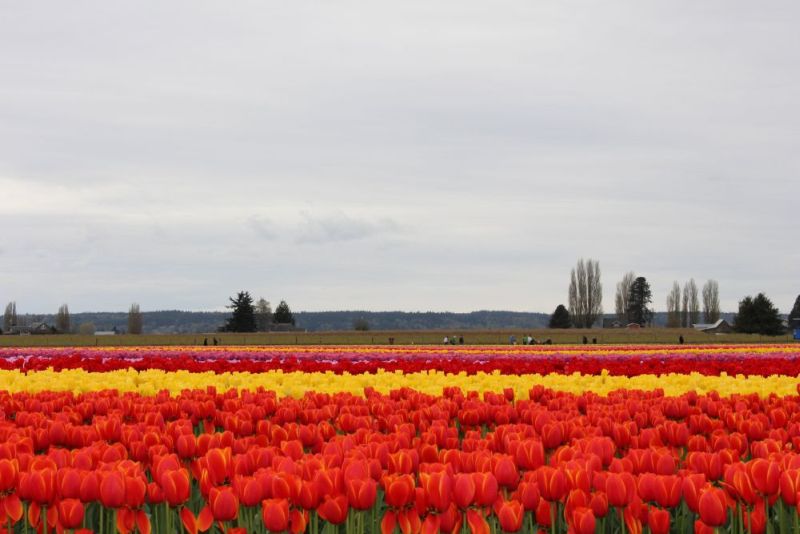
📷

Capture Stunning Tulip Field Photos

From golden hour light to low-angle drama — master the art of tulip field photography with expert tips for every camera and skill level.

🌅 Golden Hour 📐 Composition ⚙️ Camera Settings 📱 Smartphone Tips 🎨 Color & Contrast
Tulip field photography golden hour
15 Pro Tips Inside

Tulip fields offer a dream setting for photographers — but capturing their true beauty takes more than just pointing and shooting. The right light, angle, and settings make all the difference.

Whether you're using a smartphone or a professional DSLR, these techniques will transform your tulip shots from ordinary to extraordinary.

Red tulips
Pink tulips
Purple tulips
Yellow tulips
Blue tulips
Red tulips field

Master Every Shot

From lighting and composition to angles and editing — your complete field guide.

Best tulip photography locations
02
Location
Choose the Right Location

World-class tulip spots: Keukenhof (Netherlands), Skagit Valley (Washington), Michigan festivals. Arrive early to claim prime positions before crowds arrive.

Netherlands — Keukenhof & Lisse fields
Washington — Skagit Valley mountain backdrops
Michigan — classic Midwest tulip festivals
Low angle tulip photography
04
Angle
Get Low for Drama

Kneel or lie down and shoot at flower level. This immersive perspective makes tulips feel towering and majestic, with the field stretching to infinity behind.

Shoot at tulip-head height
Creates immersive, dynamic feel
Sky becomes a clean backdrop
Single tulip bokeh photography
05
Macro
Focus on One Tulip

Sometimes less is more. Isolate a single bloom with a blurred, dreamy background (bokeh). The result is an intimate, emotional portrait of the flower.

Use f/2.8 for silky bokeh
Fill the frame with one bloom
Perfect for artistic, emotional shots
Tulip color contrast photography
08
Color
Capture Color Contrast

Tulip fields are all about color. Seek out rows where different hues meet — red against yellow, pink against purple — for visually striking, high-impact compositions.

Contrasting color rows side by side
Bright vs. soft tonal pairings
Repeating color patterns as texture
Person in tulip field for scale
09
Storytelling
Include People for Scale

A lone figure in a vast tulip field conveys the sheer scale of the blooms and adds human emotion to the scene — turning a landscape into a story.

Place subject off-center for balance
Wide shot emphasizes field scale
Candid moments feel most authentic
Editing tulip photos Lightroom
13
Editing
Edit for Maximum Impact

Post-processing is the final polish. Lift shadows, boost vibrance (not saturation), add clarity, and sharpen selectively. Tools: Lightroom, Snapseed.

Boost vibrance, not raw saturation
Add clarity to bring out petal texture
Use Lightroom or Snapseed on mobile

Best Camera Settings for Tulip Photography

🔆
Aperture (f-stop)
f/2.8 – f/5.6 → Blurred bokeh background
f/8 – f/11 → Sharp landscape / full field
📊
ISO
ISO 100 – 200 → Keep as low as possible
ISO 400+ → Only if light is very low
Shutter Speed
1/250s+ → Windy days (freeze movement)
1/60 – 1/125s → Calm conditions
📐
Focus Mode
Single AF → Macro / single bloom shots
Manual → Precise landscape focus

📱 Smartphone Photography Tips

You don't need a professional camera — great tulip shots are absolutely possible with your phone.

👆
Tap to Focus
Tap directly on the tulip you want sharp. Then slide the exposure dial to brighten or darken the scene manually.
🖼️
Use Portrait Mode
Portrait mode simulates a shallow depth of field, blurring the background beautifully around a single bloom.
🚫
Avoid Digital Zoom
Digital zoom degrades quality. Move closer physically instead, or crop in post-processing for better results.
☀️
Always Shoot in Natural Light
Phone cameras shine in good natural light. Golden hour is your phone's best friend — use it every time.
Tulip field rows
Pink tulips close up
Purple tulips
Yellow tulips
Blue tulips
Red tulips
Pink tulips
Tulip photography mistakes to avoid

Avoid These Common Mistakes

Even experienced photographers fall into these traps.

Harsh Midday Light
Overhead sun creates deep shadows in petals, washes out colors, and makes reds look orange. Always wait for golden hour.
Overexposure
Blown highlights destroy delicate petal gradients and color detail — especially in white and yellow tulips. Expose to the right carefully.
Cluttered Composition
Too many visual elements compete for attention. Simplify — one strong subject, clean background, deliberate framing.
Use Natural Elements
Dew drops on petals, wind movement, shadows at play, and sunlight filtering through blooms add magic and texture to every frame.
Keep Background Clean
A simple sky, soft bokeh field, or complementary color behind your subject makes the tulip the undisputed star of the frame.

Creative Tulip Photo Ideas

Go beyond the obvious and create images that truly stand out.

Tulips with sunrise light
🌅
Tulips with Sunrise
Arrive before first light. As the sun crests the horizon, it fires through the petals with a breathtaking glow impossible to replicate later in the day.
Dew covered tulip petals
💧
Dew-Covered Petals
Early morning dew transforms each petal into a jewelled surface. Get macro-close and let the droplets become the stars of your composition.
Tulip rows disappearing into distance
🛤️
Rows into the Distance
Position yourself low at the end of a long row and watch the tulips converge to a vanishing point. This classic perspective never fails to captivate.
Tulips with mountains or sky
⛰️
Tulips & Mountains
At Skagit Valley or Kashmir, snow-capped peaks provide an extraordinary backdrop. Use a wide angle to frame both the blooms and the soaring peaks behind.
Tulip photography checklist

Quick Photography Checklist

Run through this before every tulip field session.

Shoot during golden hour — sunrise or sunset only
Use leading lines — shoot along rows, not across them
Try low angles — get down to flower level
Focus on details — isolate single blooms with bokeh
Keep composition clean — simple backgrounds win
Set low ISO (100–200) for clean, crisp images
Vary your shots — wide, mid, close-up, overhead
Edit thoughtfully — boost vibrance, add clarity

Photographer's FAQ

What is the best time to photograph tulip fields?
Early morning (sunrise) or late afternoon (sunset) — known as golden hour. The soft, warm, directional light creates long shadows, saturated colors, and a painterly glow that's impossible to achieve at other times of day.
What camera settings are best for tulip photography?
Use ISO 100–200 for clean images. Set aperture to f/2.8–f/5.6 for blurred backgrounds or f/8–f/11 for sharp landscapes. Increase shutter speed to 1/250s or faster on windy days to freeze petal movement.
Can I take good tulip photos with a smartphone?
Absolutely. Tap to focus on your subject, use Portrait Mode for bokeh effects, avoid digital zoom, and always shoot in natural light — preferably golden hour. The best smartphone photos come from great light and composition, not specs.
How do I make tulip photos look professional?
Apply composition techniques (leading lines, rule of thirds, low angles), shoot in optimal natural light, and do light editing in Lightroom or Snapseed. Boost vibrance rather than saturation, add clarity, and lift shadows slightly.